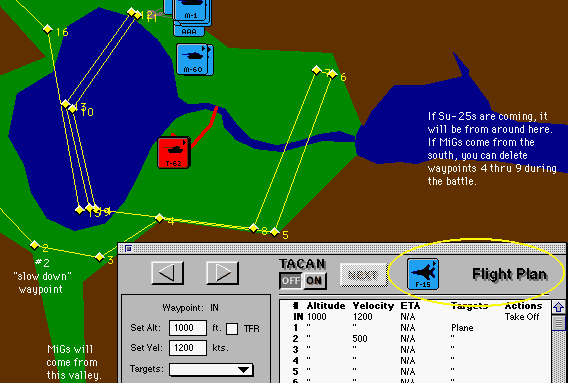
This method has had, I would say, a 75-80% success rate for me. Success is heavily dependent on help from the computer hogs and the F-15, so vectoring of these planes is discussed in detail. Take a look at the accompanying graphics to clear up waypoint or target questions.
1. F-15
Program the F-15 to fly straight to the southern tip of the lake (the gap in the mountains) as fast as possible. I set his speed enroute at 1200 kts, but set a special waypoint to slow him down when he gets there, or else his tremendous momentum may send him into a mountainside. Set altitude 1000' and target "Aircraft" of course. (See "F-15 - Way Info" graphic below)

Send the A-10 parked closest to the F-15 to tightly canvas the battle area around the garrison (5-6 passes) at 300' and 300 kts, loaded with 6 MAV E/Os and 4 GP82s. Set target for "Anti-Aircraft" only. (See "AA Hog - Way Info" graphic below)
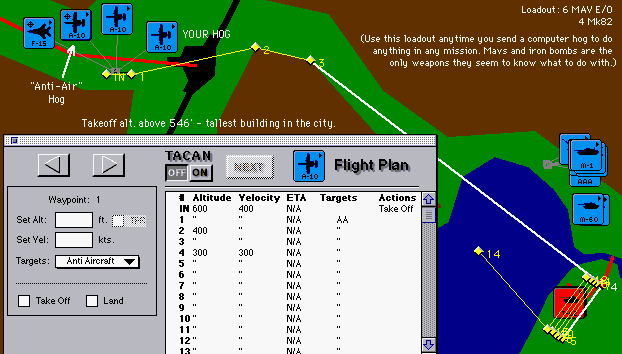
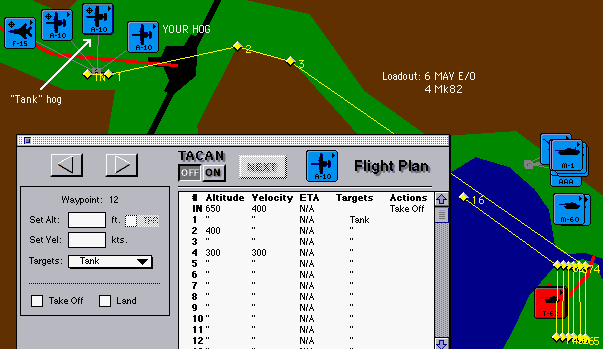
NOTE: If all WAY INFO is set up properly, the F-15 and the two A-10s will start engines and taxi straight out in perfect unison when you UNPAUSE the game. Hop in your Hog and make sure this happens before you taxi out yourself. The computer planes, if programmed correctly, make all the difference in this mission. If one of them gets left behind because a TACAN command was omitted, your chances of success drop. (And if it's the F-15 that doesn't make the trip, your chances of completing the mission successfully disappear almost completely...unless you luck out and the game decides not to throw any enemy aircraft at you. It happens, albeit rarely.)
There's a LOT of stuff to remember setting WAY INFO, it's VERY easy to leave something out. (I seem to manage it almost every time I play this mission.)
3. YOUR HOG
Your hog (the A-10 parked farthest from the F-15) gets 4 AIM-9s, 4 HARMs, and 2LG84s and 2 GP84s. The ZSU and/or one of the S-2s will be painted, and an LG84 will eliminate not only the painted target but anyone close by as well. Once you get good at programming the computer planes, you can forget the GP84s and just load up with extra HARMs...and maybe even Mavericks. Extra HARMs are handy, and once the radar sources are all taken out HARMs become just monster Mavericks as far as the A-10 weapon model is concerned: Put the pipper (guncross) on the target and fire. The GP84s are for the armor, and the computer A-10s seem to clean house nicely in that area IF you vector them to sweep the proper areas of the battlefield.
Once all the prep is done, drop your pilot in and UNPAUSE...
Your goal: Protect the M-1s so they can get into the gray base (garrison).
1. Radar/SAMs
As you cross the lake, look for spikes and HARM them quickly. Four spikes? Use four HARMs on them right then. You want to dump some weight anyway. (Caveat: Much of that radar will be coming from in and around the city, and your HARMs may hit buildings.) ALSO: Make sure to set your RWR on GROUND radar targets only (GND) or else you may accidentally HARM the F-15 if he's around.
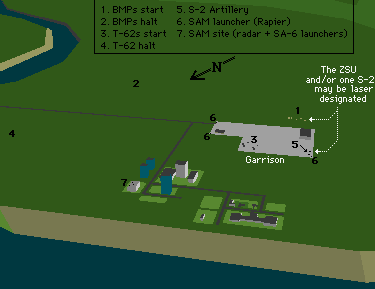
There are SAM launchers at the eastern and western corners of the garrison (See "Battlefield Diagram" graphic below) and usually this salvo of HARMs combined with the Anti-Aircraft computer hog takes all or most of them out. If not, you'll know it because you'll be dodging missiles all day.
3. S-2 Artillery/AAA (Laser designated targets)
Once planes are neutralized, and you've HARMed what radar you can, your focus should be the S-2 guns in the western corner of the garrison. If you brought some LG bombs, and have confidence in them, launch them on any painted targets (ZSU and/or S-2.) I prefer LG Mavs, or strafing with the cannon, both S-2s in one pass if possible. This artillery will puree your M-1 tanks if you don't get them, and if all M-1s die you fail the mission. This target is crucial.
If you didn't get it with the LG bomb, circle around and use a HARM (if you have one left) on the ZSU, in the middle of the BMPs. NOTE: You may have unknowingly HARMed his spike when you were going after the SAMs.
4. Tanks
Once you get that ZSU though, forget about the rest of the BMPs for a minute and go get the T-62s to the north, up between the city and the bridge. Your goal is to protect the M-1 Abrams tanks while they cross the bridge, and the T-62s and S-2s are shelling the crap out of them. If your brought one, a Mk84 in their midst should solve most of your problems there. If you didn't bring one, the computer hog should clear many of them for you.
Finish off the BMPs. Use the cannon to sweep up after the computer hog; it will likely have taken care of most of the BMPs by this time. Your M-1s should be home free.
NOTE: You won't get the "CONGRATS" message until at least one M-1 has driven by the city and come to a stop in the garrison.
Hope it helps! (Comments and suggestions are encouraged.)
Steve Russillo
RussilloSM@gmail.com
Oct. 5, 1997